Interior Design AI Render from a Sketch or Photo
By Inkfinish · · 8 min read
An interior design AI render earns its place at the moment a client has to imagine a room: you have a perspective sketch, or a photo of the room as it is today, and they need to see oak where the carpet is. Inkfinish takes either one plus a sentence about materials and light, and returns a photoreal render in about 30 seconds. You can then change just the floor, or just the curtains, without re-rendering the room.
This post follows one real room sketch from start to finish. It shows the line check honestly (this room scored 61%, and we explain why interiors score lower) and ends with what to tell clients about AI images.
Two starting points: a sketch, or a photo of the room
A perspective sketch
One-point perspective is the easiest to read: back wall, floor and ceiling lines, furniture as simple boxes.
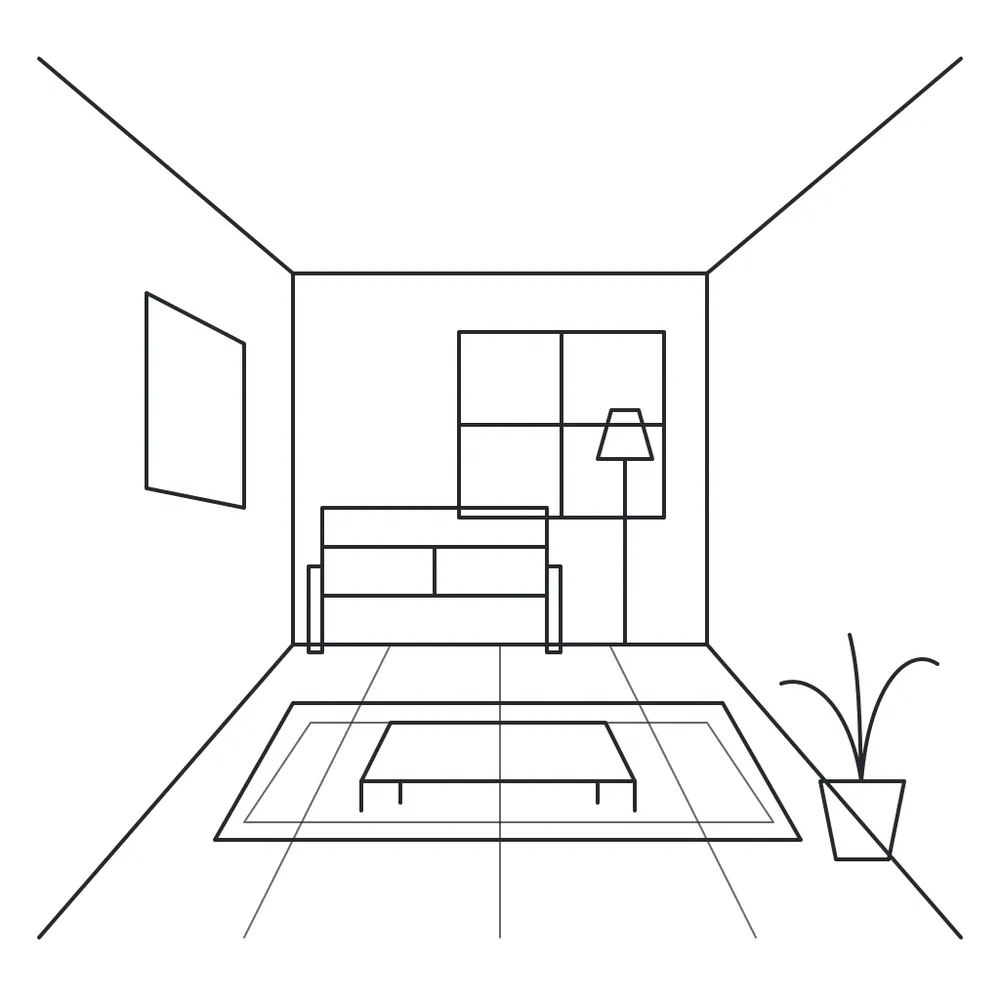
Draw the pieces you care about. Firm lines help more than detail. Construction lines are fine, but they count in the line check.
A photo of the existing room
For a refurbishment, a photo of the real room is often the better start, because the walls, windows and camera are already true. Stand in a doorway or corner, hold the phone at eye level, keep the horizon level and shoot in daylight. Clear anything you do not want reinterpreted.
People in the room are fine. Photos where a person is the main subject are refused, since the app renders designs and spaces, not people.
What to type for an interior design AI render
A good interior description covers four things, in this order:
- Materials. The floor, the walls, the main fabrics, the wood species.
- Light. Daylight from the windows, warm lamps, or both, and the time of day.
- How lived in. A styled, empty room and a room with a throw and books on the table read very differently.
- Only what should change. You do not need to describe the layout. The sketch or photo already does.
The Interior subject handles the camera: an eye-level view with a moderate wide lens and a level horizon, daylight mixed with warm lamps, honest texture in wood, fabric and stone, and a room styled as lived in without clutter. Spend your words on finishes.
Here is the description we typed for the sample sketch, verbatim:
Warm Scandinavian living room, oak floor, linen sofa, soft morning light
Some additions that change the result the most:
| If you want | Add words like |
|---|---|
| Daylight only | soft morning light, lamps off |
| An evening scene | evening, warm lamps on, dark outside the window |
| A lived-in room | lived in, a wool throw on the sofa, books on the table |
| A calm, styled room | minimal styling, clear surfaces |
| A specific floor | wide oak boards, matte finish / polished concrete / terracotta tiles |
These are starting points, not rendered examples. For more vocabulary, see how to write a render prompt for materials and light.
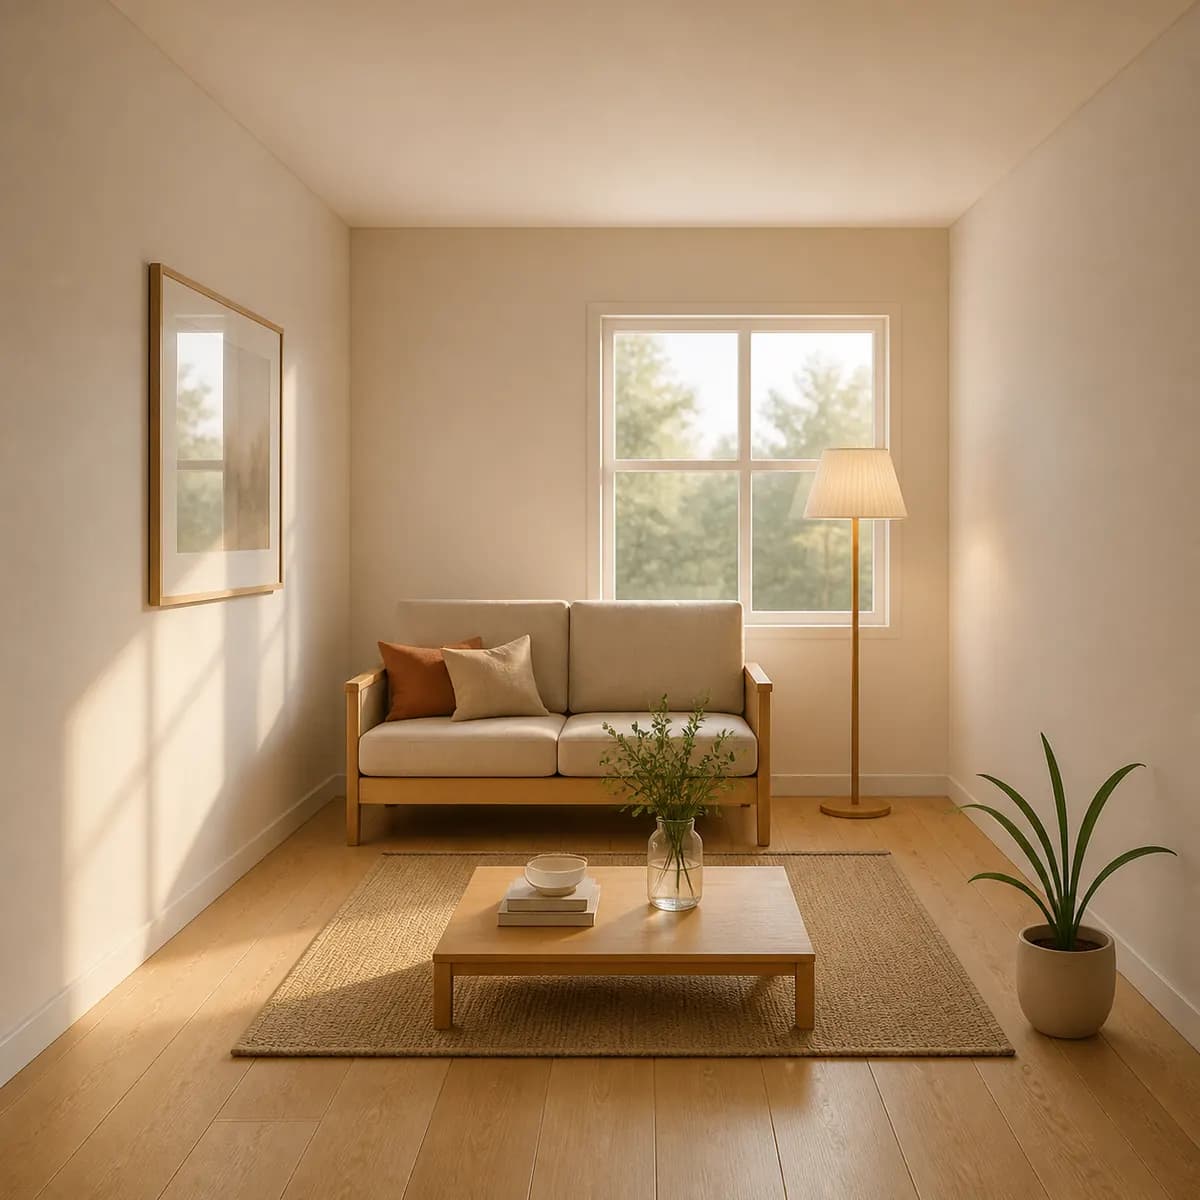
The render, about 30 seconds later
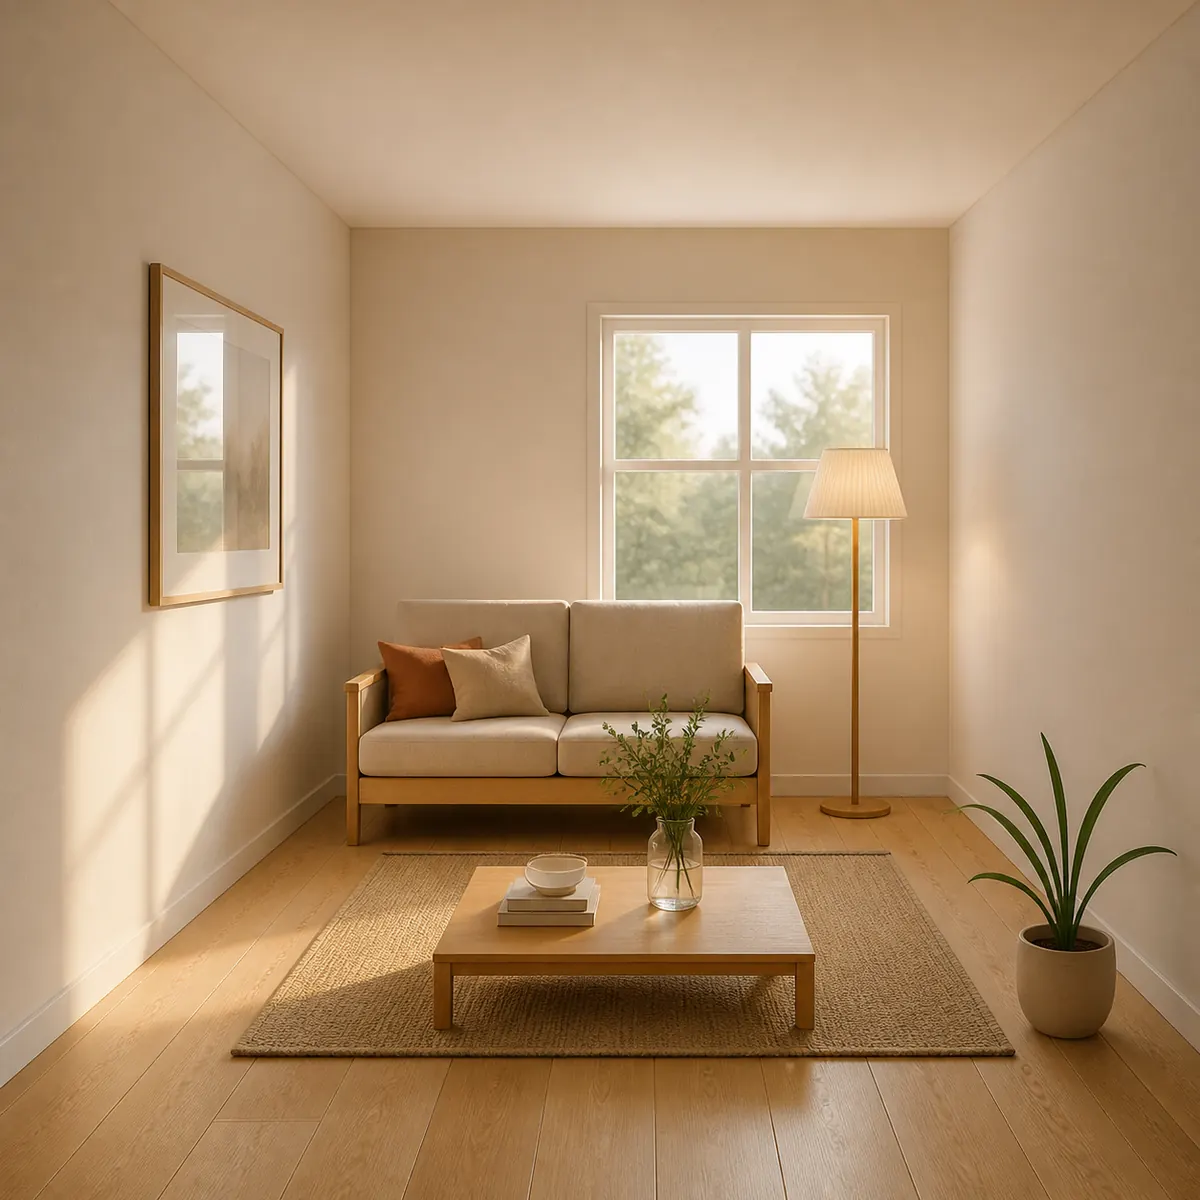
Everything in the sketch is there: the window on the back wall, the sofa in front of it, the floor lamp, the rug and coffee table in the middle, the plant front right, the picture on the left wall. The description supplied the finish: oak boards, a linen sofa with an oak frame, a textured rug, low sun across the left wall.
Reading the line check on a room: why 61% is not a failure
The line check under this render reads "61% of your lines kept", with a note to check the red ones. Press "Show lines" and the sketch is drawn over the render, blue where the render has a line in the same place, red where it does not.
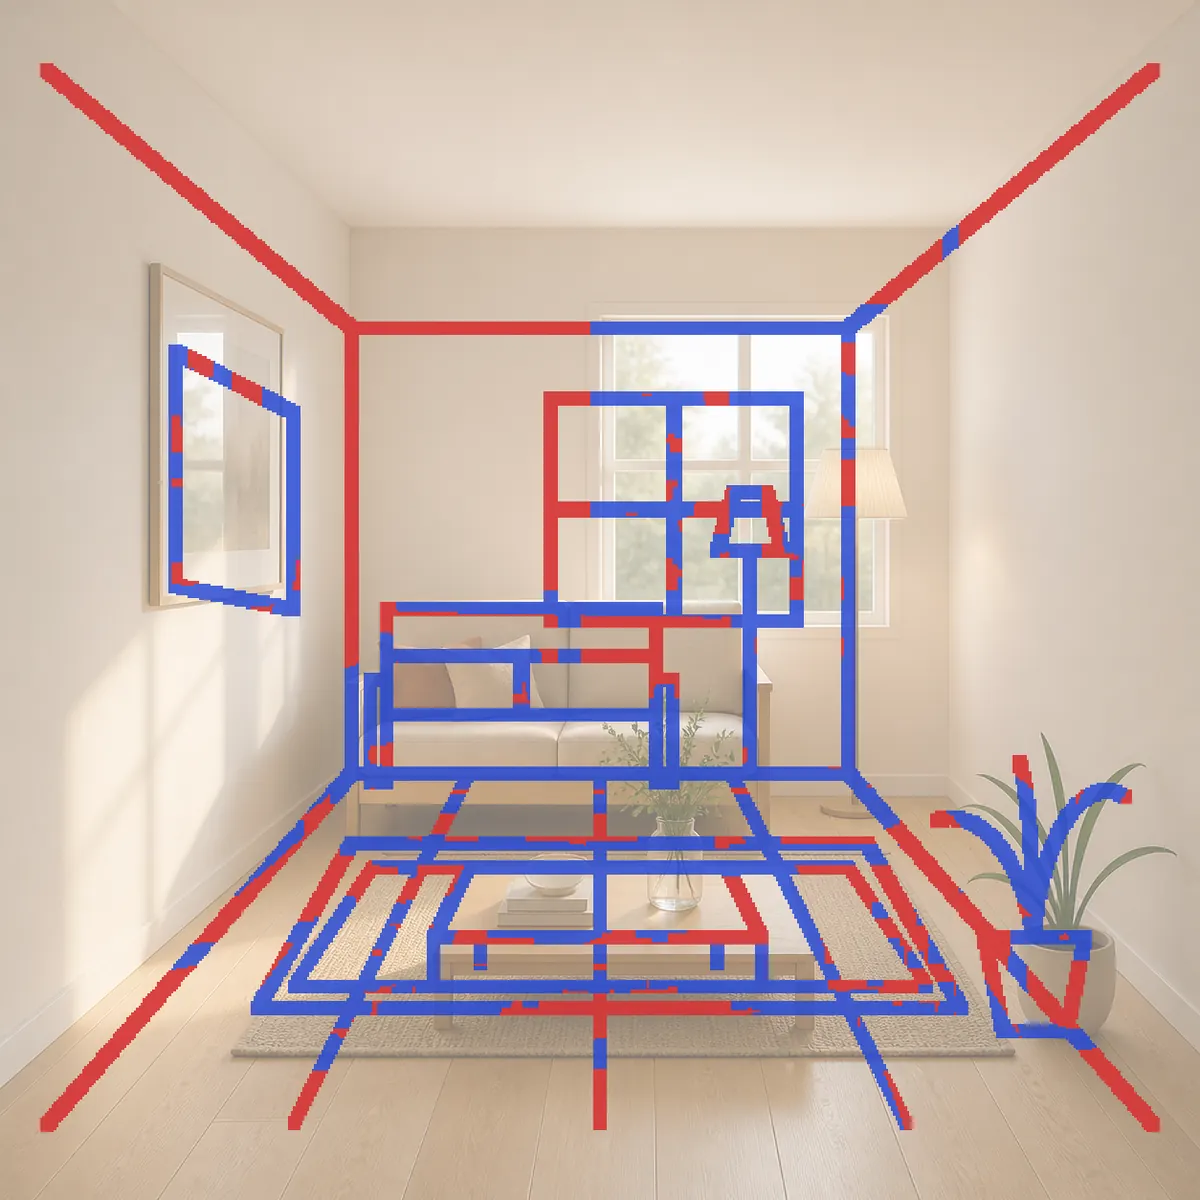
Interiors score lower than exteriors for a plain reason. A room sketch is full of lines a finished room does not draw. The ceiling diagonals run out to the corners of the frame, the floor has perspective guide lines, and the rug is drawn as two nested rectangles. In a photograph, a ceiling corner is a soft change of tone, a floor is boards, and a rug has one edge. Those lines show red even when the room is right.
That explains part of the red, not all of it, so read the overlay rather than explaining the number away. Laid over the sketch, the arrangement held: same objects, same walls, same order from front to back. But sizes and positions moved. The window came out larger, the floor lamp stands further right, at the window's edge rather than in front of it, and the sofa and rug are wider than drawn. For a mood image, that is fine. For a client who will check the sofa against the wall, it is not, and you should know before they do.
One more thing to know about the overlay: blue means the render has an edge near that line, not that it is the same object. Busy areas can read as kept. Use the compare handle as well, and see does AI rendering keep your design? for how to read the overlay in more depth.
On a photo, the score says less. A photo's lines are furniture edges, shadows and texture, and a refinish is meant to change many of them. Check that the walls, windows and ceiling line held, and do not compare a photo's score with a sketch's.
Two versions from one sketch
We sent a follow-up in the same design, adding two words to the description, and rendered again:
Warm Scandinavian living room, oak floor, linen sofa, soft morning light. Halloween theme.
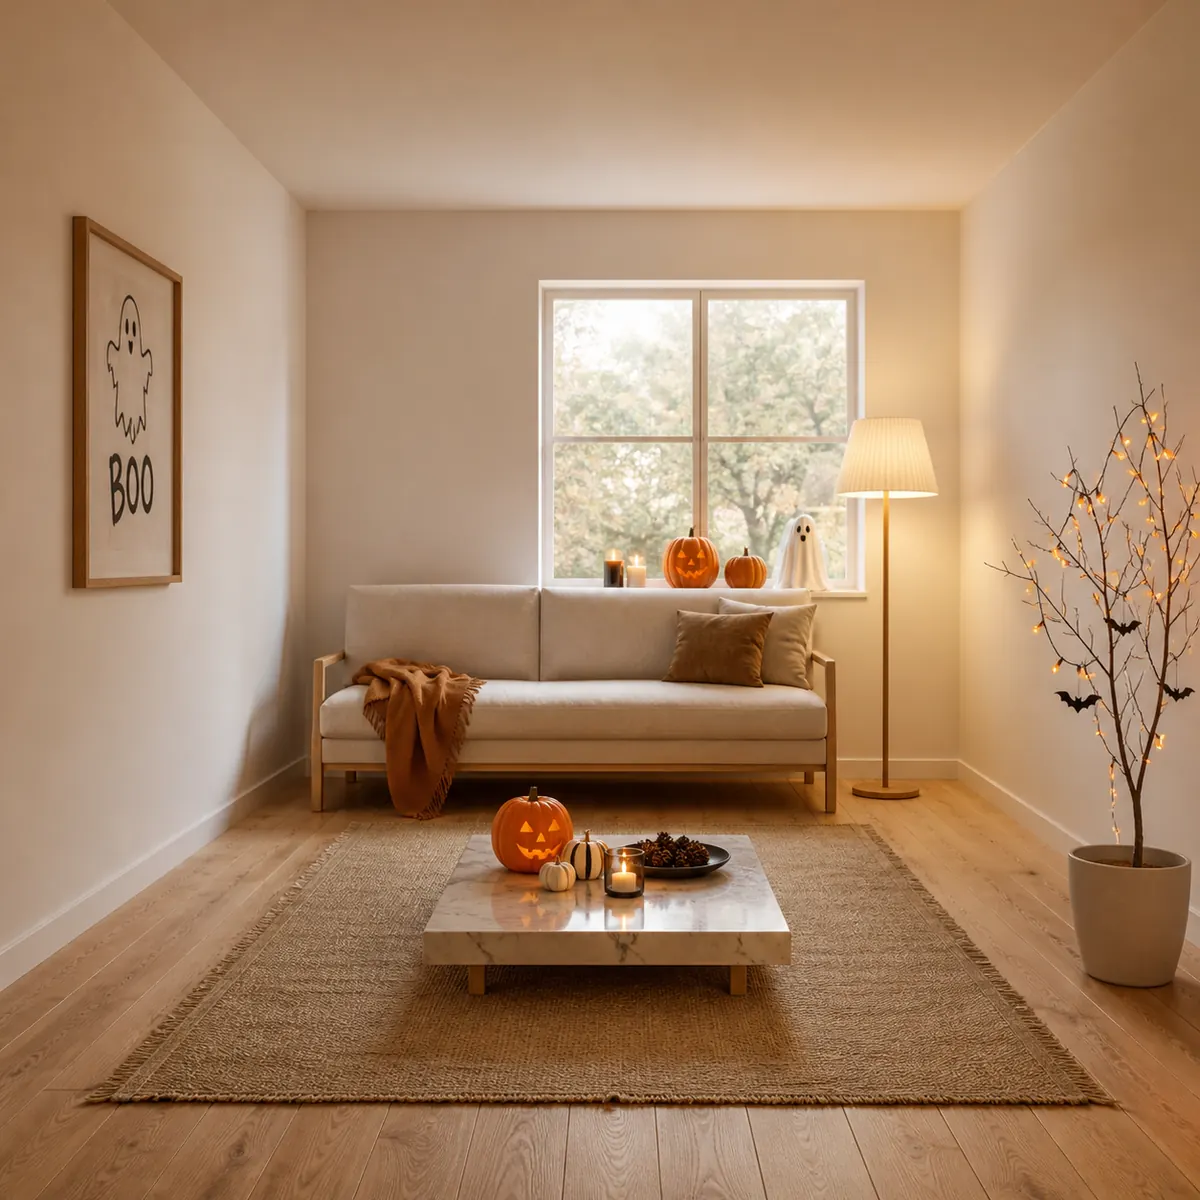
It arrived as version 2 in the same strip, and version 1 is untouched. Its line check scored 62%. The room is the same arrangement, now with pumpkins, a ghost print in place of the picture, a throw on the sofa, and branches with paper bats where the plant was. The coffee table became marble, which nobody asked for.
The geometry also drifted differently: the room is wider and the sofa longer than in version 1. A second render is a new render, not an edit. For the same room with one thing different, use the brush.
Change just this: floor to oak, curtains to linen
"Change just this" redraws only the part you mark. It is the tool for the request every interior designer gets: "Can I see it with a wood floor?"
Say your first version came back with pale gray carpet and a bare window, and the client wants to see wood and curtains:
- Open "Change just this" on that version.
- Paint loose strokes over the floor. The brush size slider and Undo help; you do not need clean edges.
- Type what it should become. For an Interior render the idea chips include "Oak flooring" and "Linen curtains", or write your own, such as "wide oak boards, matte".
- Press "Change it" (5 credits). The area around your marks is redrawn and everything else is copied back from the version you started from, so the sofa, window and walls stay as they were.
- Do the curtains as a second edit: one mark on each side of the window and "Linen curtains". Added things are drawn whole, even past your marks, so the curtains arrive as complete curtains, not fragments.
Each edit saves a new version, so the carpet version is still there for the comparison slide. If an edit fails, you are not charged. The tutorial covers Change just this with an animation.
Crop & colour: warmth and framing for a client deck
Crop & colour is free and uses no AI. You can crop to Square, 4:5, 3:2, 16:9 or 9:16, rotate a quarter turn, flip, and adjust brightness, contrast, saturation and warmth. The result is saved as a new version, and the one you started from stays as it is.
For a deck, crop to 16:9 and nudge the warmth so the morning light matches your other slides. Because no AI is involved, nothing in the room changes. Then download the image, or, when signed in, email the full-size file to yourself.
What to tell clients about AI images
An AI render can help a client decide, or it can cost you trust later. The difference is mostly what you say when you show it.
- Say what it is. "This is an AI render made from my sketch, to show materials and light. It is not a measured drawing."
- Say what is fixed and what is not. The layout comes from your design. Sizes, spacing and the furniture in the picture are approximate; the drawings govern.
- Do not let it specify products. The sofa is "a linen sofa", not a model they can order. The oak is a color and grain idea, not a sample. Bring real samples to the next meeting.
- Show the overlay if accuracy comes up. It is a quick, visual way to show what came from your drawing and what did not.
- Keep the versions. Showing the carpet and oak versions side by side is more persuasive than one image, and you can always return to either.
- Be clear when it started from their photo. "I changed the finishes on an AI image of your room" avoids an awkward moment when the skirting looks slightly different.
A caption that works on a slide:
AI render from our sketch, for materials and mood. Layout per drawings; furniture and sizes indicative.
Limits
- Sizes and positions can shift, as this room shows. Not for dimensioned layouts, joinery or anything a contractor will measure from.
- Products, fabrics and paint colors are approximate. No paint-code matching.
- The line check is less informative on photos.
- No plans, elevations or 3D models. It makes images.
- Photos where a person is the main subject are refused.
- Free renders carry a watermark. Sign in with a Google account and your first 3 renders are free. Plans are on the pricing page.
For the rest of the method, the sketch-to-render guide covers every subject and the tutorial shows each step. If you have a photo of a room you are working on, render a room from a photo, free.