AI Rendering for Architecture Students: A Guide
By Inkfinish · · 8 min read
AI rendering for architecture students is mostly about time. The crit is on Thursday, the hand sketch is the best thing you have, and there is no evening left to build a scene, assign materials and wait on a render engine. A tool like Inkfinish takes a photo of the sketch, or a screenshot of your model, plus a sentence about materials and light, and returns a photoreal render in about 30 seconds.
This guide covers what you can do for free, how to get from a sketch to a crit image in an evening, how to keep every version for process pages, and how to be honest about AI in crits and portfolios, which matters more than any setting.
AI rendering for architecture students: what is free
The free tier, stated plainly: Sign in with a Google account and your first 3 renders are free. Free renders carry a watermark.
What that means in practice:
- No card needed to start. Rendering needs a Google sign-in, so if you do not use a Google account, you will need one.
- 3 free renders to start, not per month. That is 15 credits, and a render costs 5 credits.
- "Change just this" costs the same as a render. Marking part of an image and saying what it becomes is 5 credits, so a brush edit uses one of your three.
- Crop & colour is free. Crop, rotate, flip, brightness, contrast, saturation and warmth use no credits and no AI.
- Failed renders are refunded, and unused free credits are kept.
Here is what the watermark looks like on a free render:
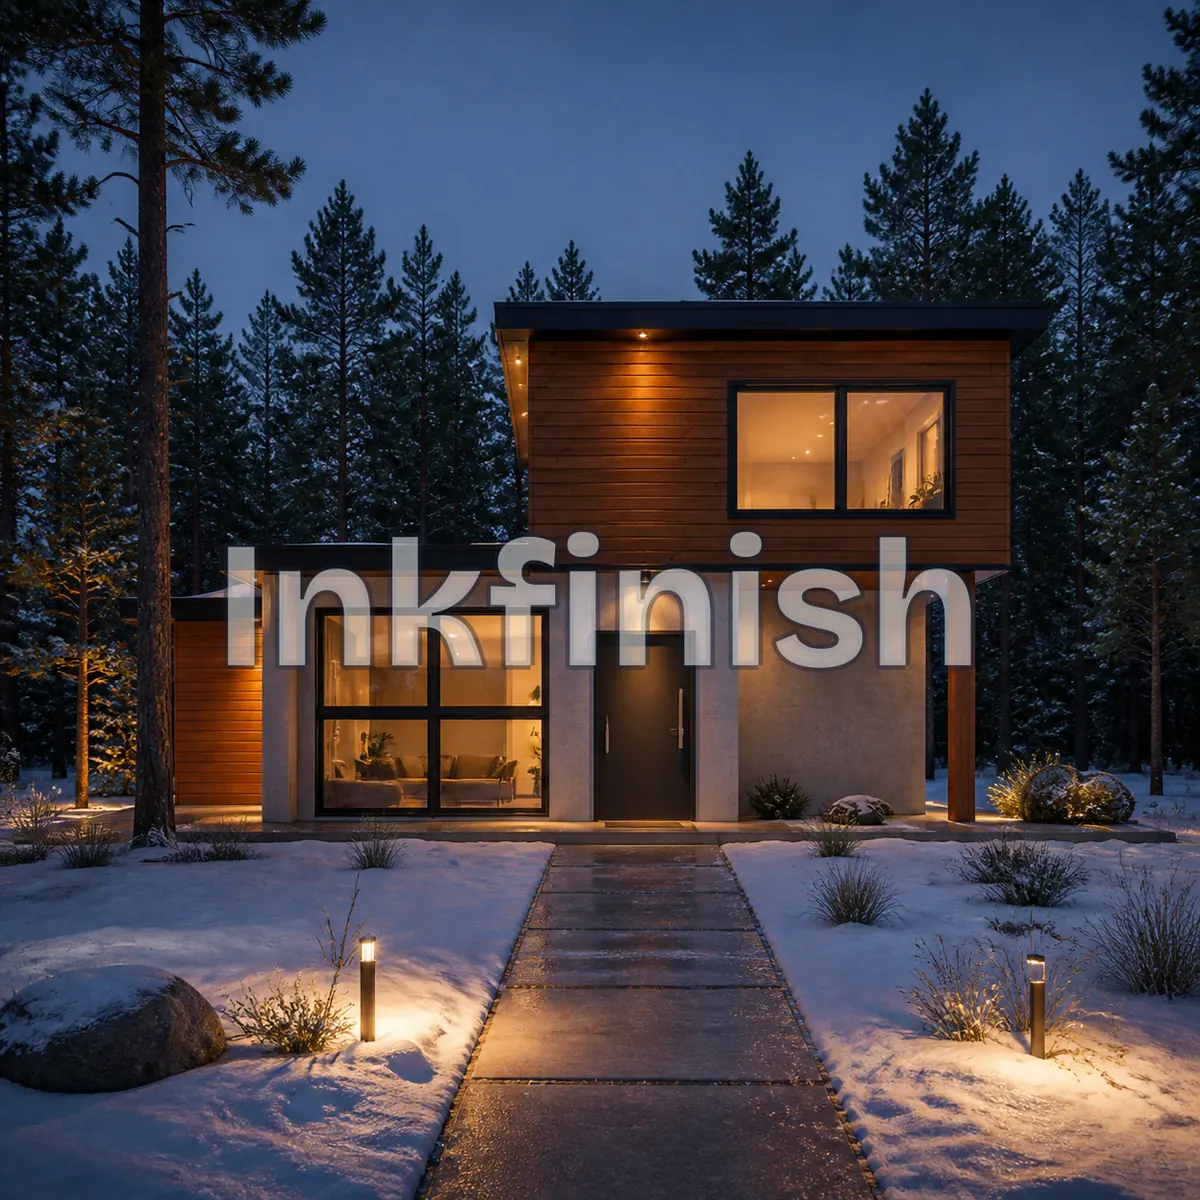
It sits across the middle, pale and see-through, so you can still judge the image. For a process page or a pin-up of working images it is usually acceptable, especially with a caption. On a final board, it will be the first thing anyone sees.
With three renders, the description is worth more thought than the button. Write it out before you start, and read the line check after every render, so each one teaches you something.
Hand sketch to crit image in an evening
Here is the whole route on one of our sample sketches, a two-story house in elevation with a path leading to the door.
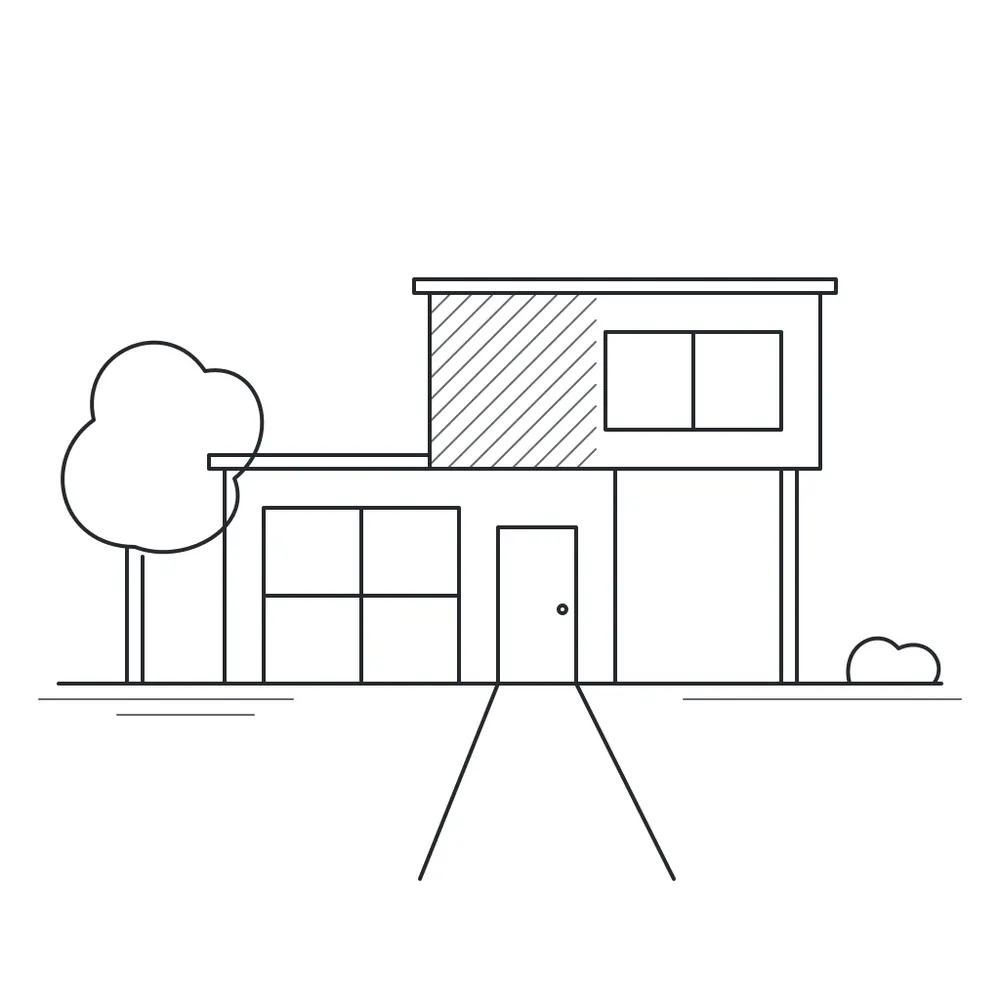
Photograph the sketch well. Daylight, the paper flat, the phone straight above it, the paper edges cropped out. Firm lines matter more than detail. Very faint pencil gives the render, and the line check, little to hold on to.
Describe the finish. This is the description, verbatim:
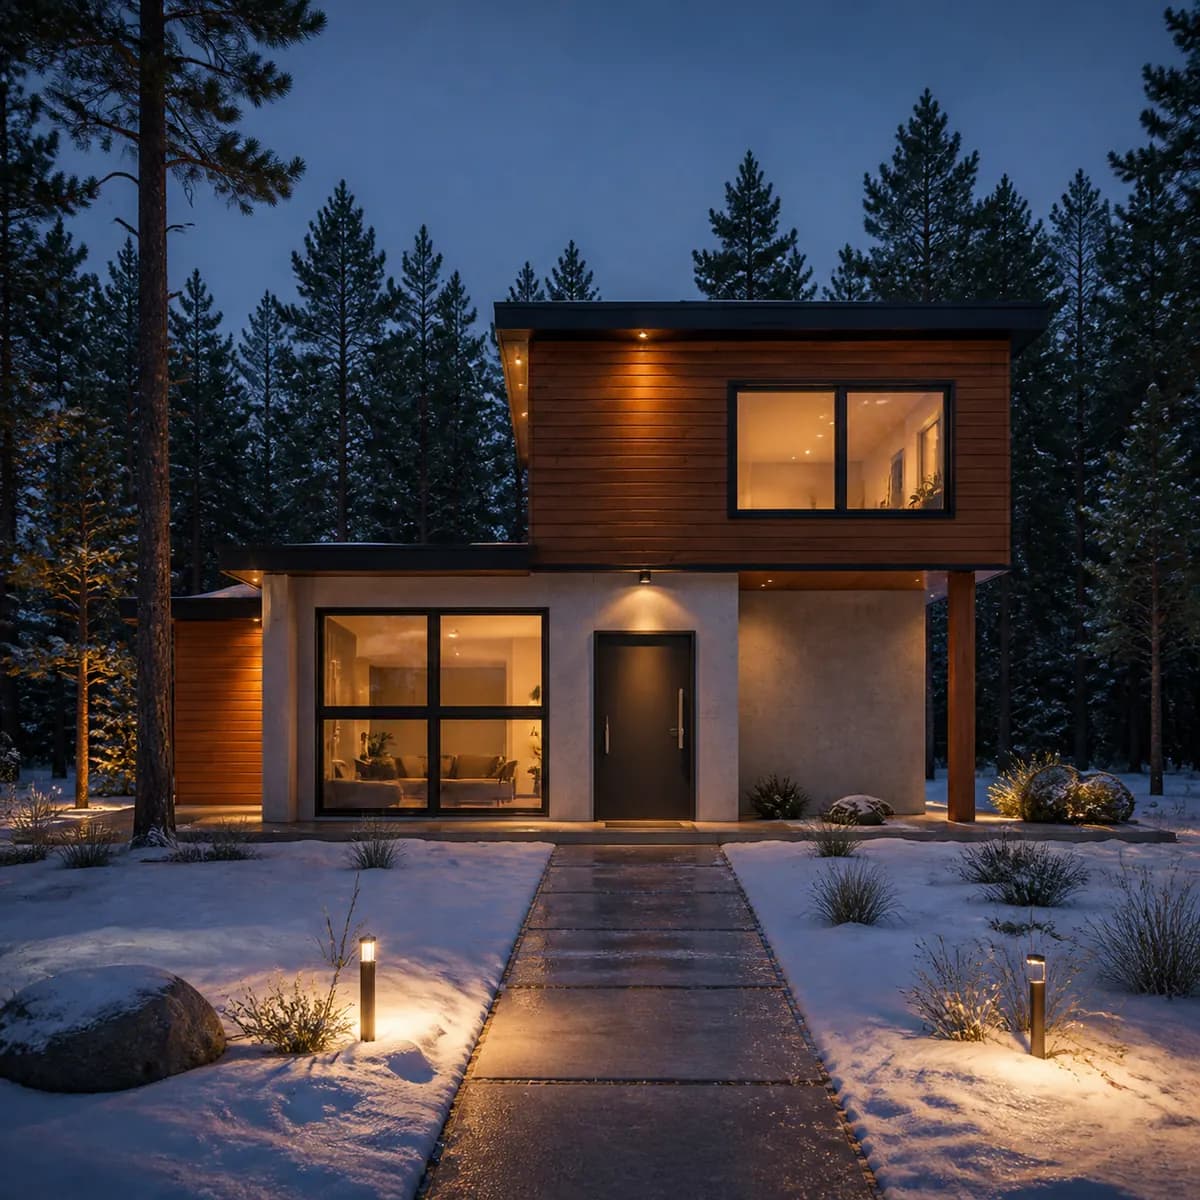
Cedar cladding and pale concrete, large glass, late afternoon sun, pine forest behind, night, lights on inside, snow on the ground
It holds a lesson. The idea chips (one-click phrases such as "Night, lights on inside") were added to a description that already said "late afternoon sun", so it asks for two kinds of light. The model chose night. Read your sentence back before you press Render.
Render. About 30 seconds later:
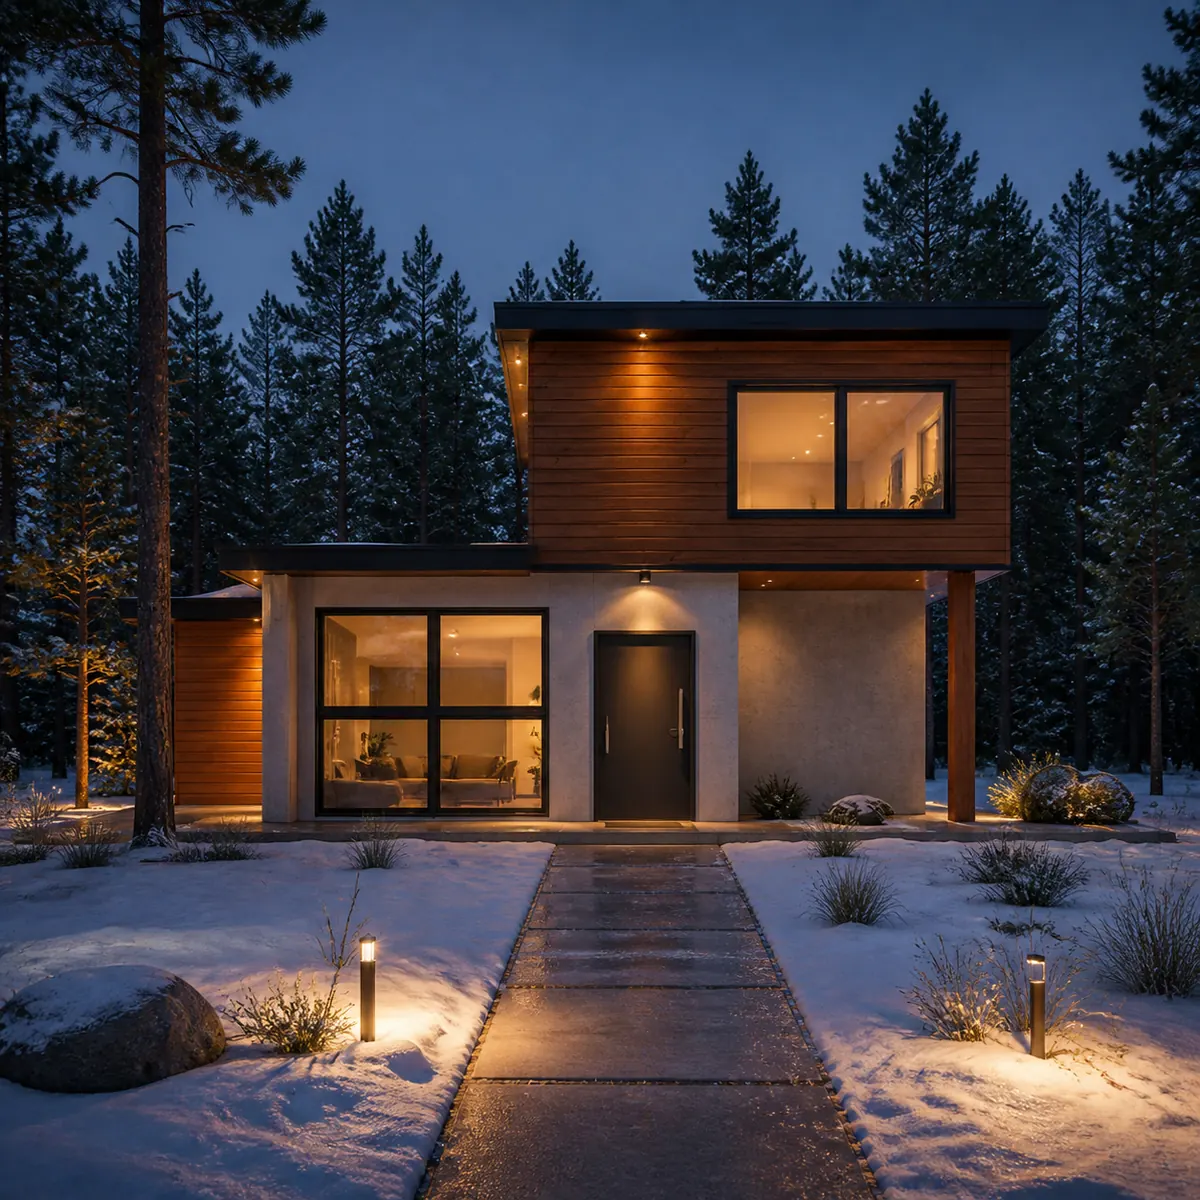
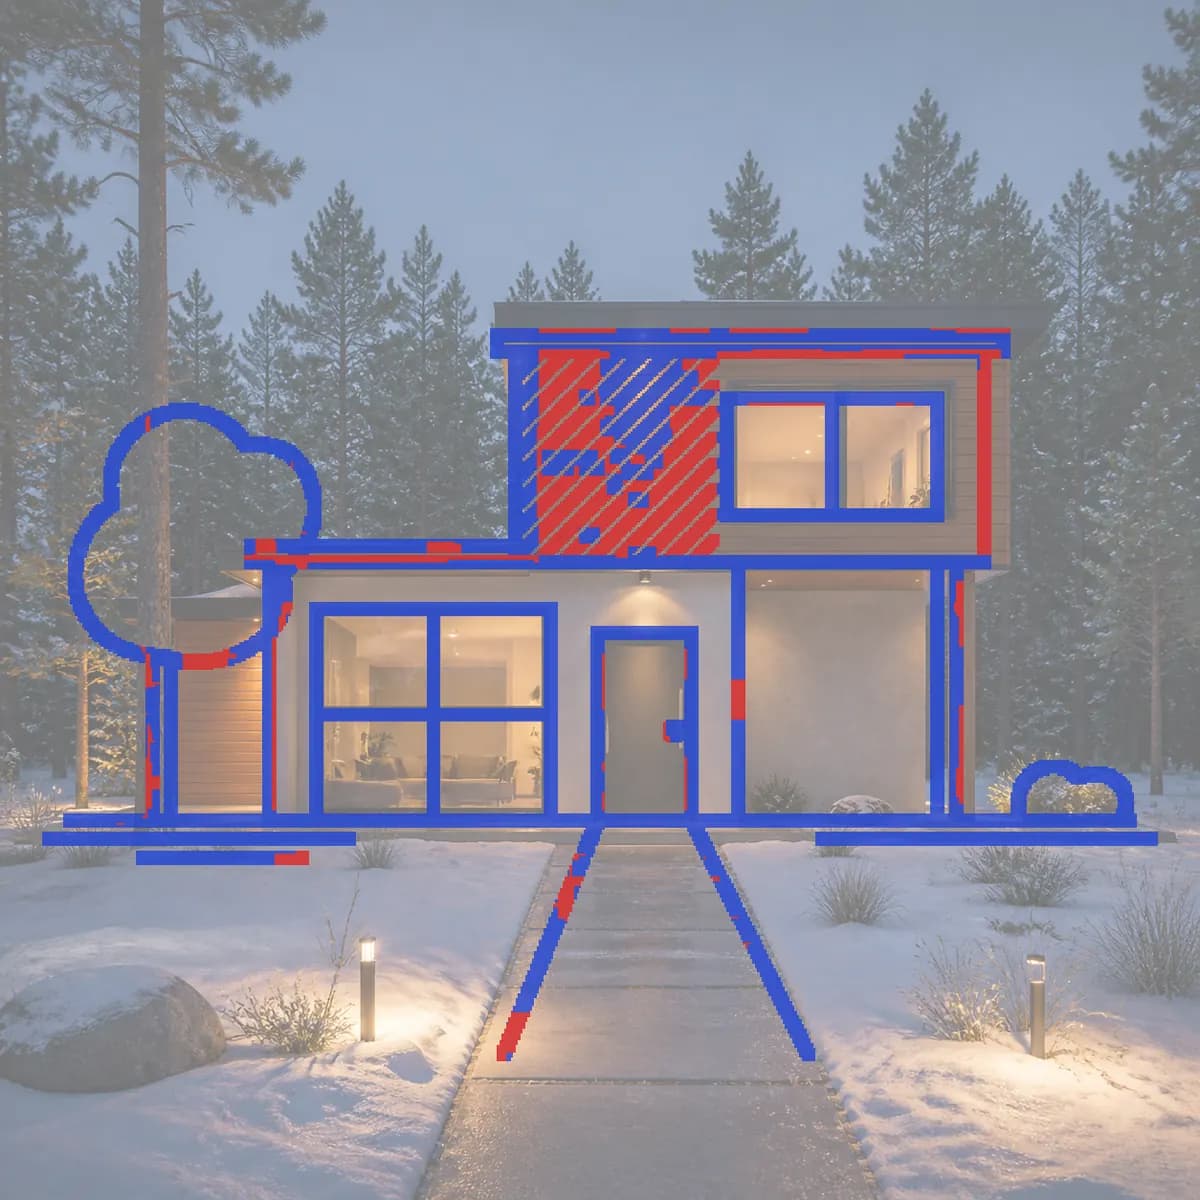
Check it before you pin it up. The line check read "82% of your lines kept", with a note to check the red ones. Here is the overlay, with the sketch's lines in blue where the render kept them and red where it did not:
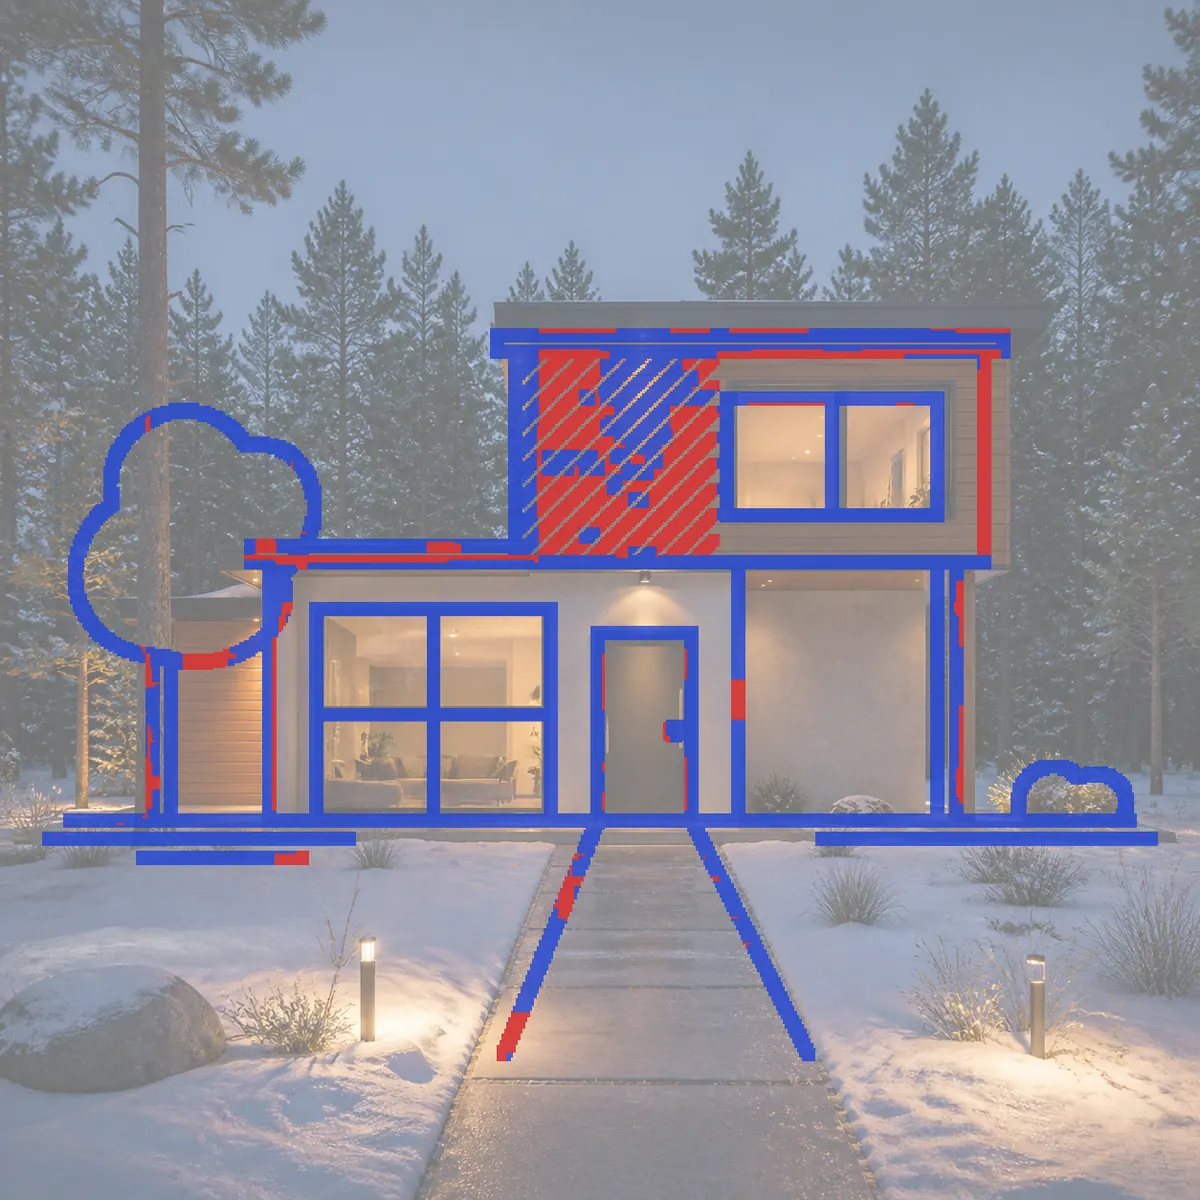
Most of the red is inside the hatched block, where the hatching became cedar boards. That is a material, not a moved wall. But the score does not flag everything a tutor will notice. The round tree you see in the sketch became a tall pine, and a small cedar-clad volume appeared on the far left, behind the tree, which the sketch does not have. Blue only means the render has an edge near that line, so the forest behind the tree reads as kept.
You have two honest options: remove the extra volume with "Change just this" (mark it, choose the "Remove this" idea), or leave it and say so. Either way, you found it before the jury did.
That is the evening: one good photo, a careful sentence, a render, a check, and maybe one fix. The tutorial walks through each step.
Model screenshot to portfolio image
If your project lives in a 3D model, you do not need a plugin or a render setup. A screenshot from your modeler is enough. The short version:
- Perspective camera at eye level, verticals kept vertical.
- Grid, axes, guides and toolbars hidden; upload the viewport only.
- Edges on, thin and dark; shadows off.
- Every material named in the description, because a white model has none.
The full checklist, and when a plugin tool is the better choice, is in render a 3D model screenshot with AI, no plugin.
For a portfolio, put the screenshot on the page next to the render. It shows the model is yours and that the render is a finish on it.
Keeping every version for process pages
Every render and every edit is saved as a new version. Nothing is overwritten, and you can go back to any version. A follow-up message in the same design renders the same sketch again, so the next render joins the same thread.
That is what a process page needs. Here is a second version from the same house sketch, with a very different description:
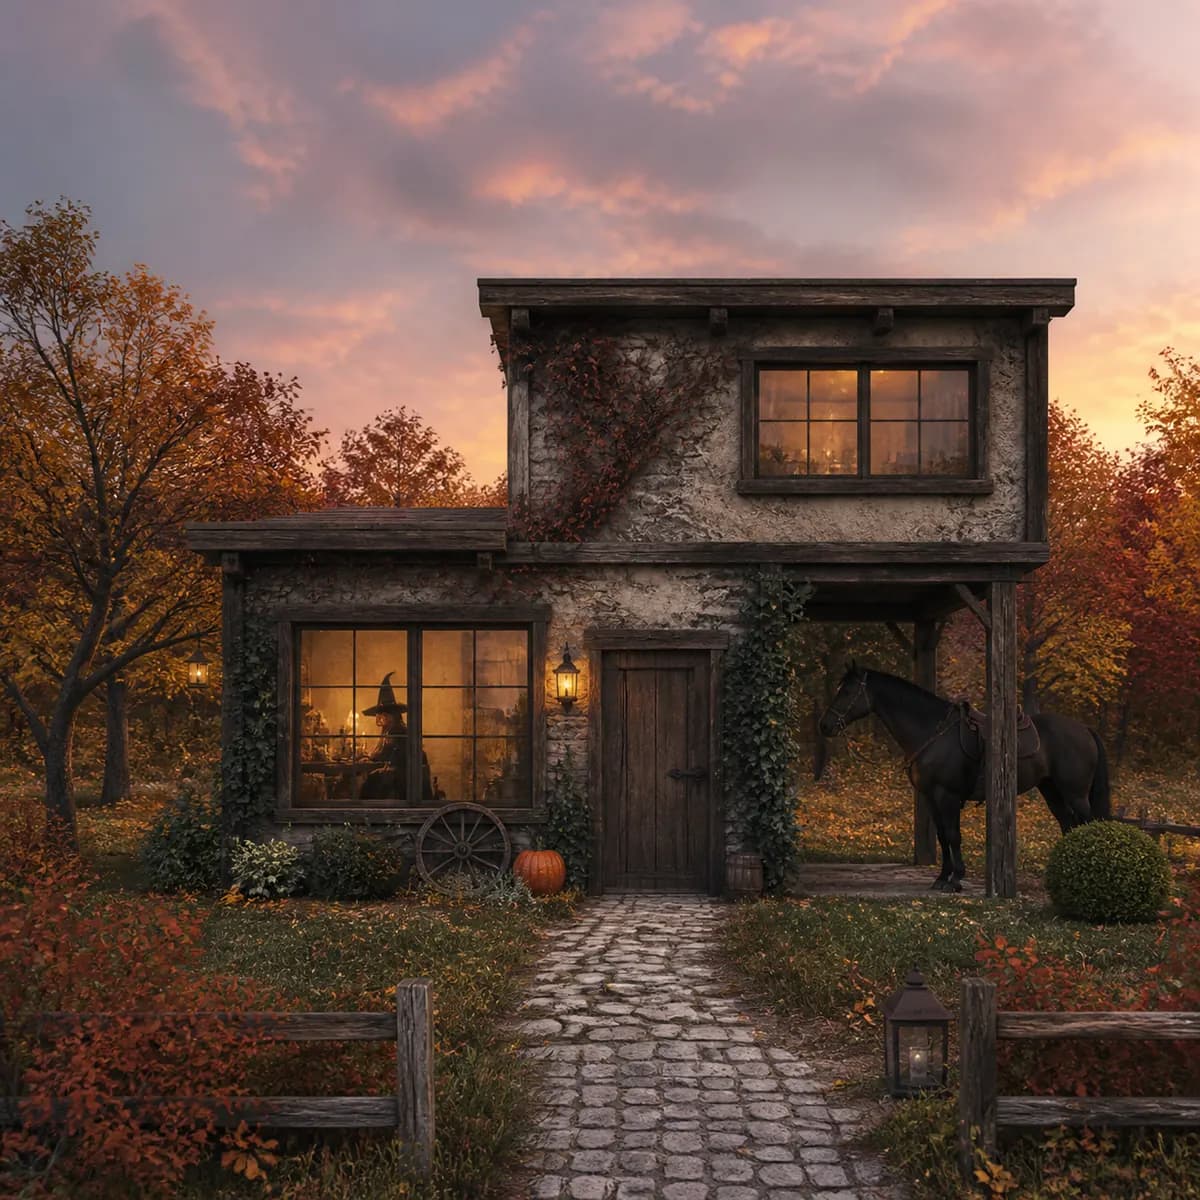
Medieval, cottage, with fall foliage in the background. With a horse. Also a pumpkin. With a cute witch inside. Dusk.
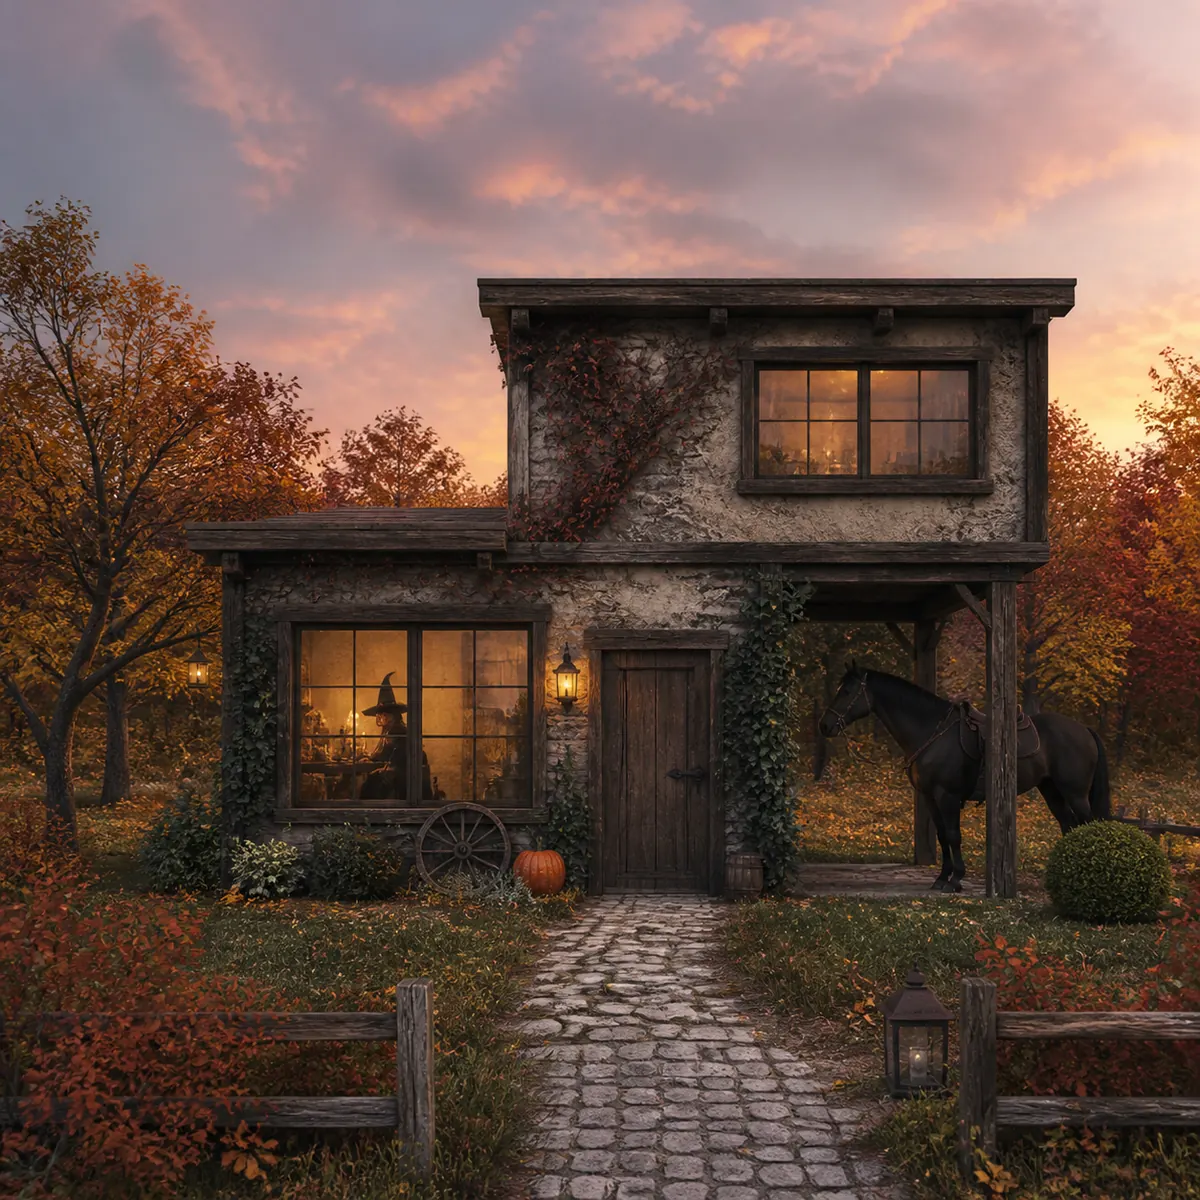
The style changed completely, and the line check scored 89%. The ground floor's window and door stayed where they were drawn. Laid over the sketch, though, the upper block came out somewhat taller and wider than drawn. A heavily textured render, all stone and foliage, puts edges near almost every line, so it can score high while things move. Read the overlay and lay the sketch over the render yourself.
A process page built from versions might look like this:
| Panel | What to show |
|---|---|
| Sketch | The original, photographed |
| Prompt | The description, verbatim |
| Render | Captioned as an AI render |
| Check | The overlay and its score |
| Decision | One line: what you kept, what you rejected and why |
The decision line is the part tutors read. "Tested a heavy masonry reading; rejected because the upper block lost its lightness" is design thinking. Five pretty renders without it are not.
Writing descriptions that teach you material vocabulary
A white model or a pencil line forces a question you cannot dodge: what is this wall made of? Writing the description is a vocabulary exercise, and the render shows you what your words did.
| Vague | Specific |
|---|---|
| wood | vertical cedar boards, oiled |
| concrete | pale board-formed concrete |
| metal roof | standing-seam zinc roof |
| glass | large glazing with thin dark frames |
| nice light | overcast soft light / low winter sun from the left |
Try the vague and the specific version on the same sketch and compare them. The subject you choose matters too. Building exterior keeps verticals straight and grounds the site with planting and paving. Interior uses an eye-level camera and mixes daylight with lamps. Product puts the object on a seamless studio backdrop. For a fuller list, see how to write a render prompt for materials and light.
Being honest about AI in crits and portfolios
This is the part to get right. An AI render of your sketch is your design with a finish on it, but only if you are clear about which parts came from you.
- Caption every AI image. Name the tool, say it came from your sketch or model, and include the prompt if there is room.
- Ask about the policy before the crit, not after. Studios and schools differ, and tutors within one school differ. A one-line email to your tutor settles it.
- Show the sketch next to the render. The design is in the drawing. The render shows materials and light.
- Do not present invented detail as a decision. If the render added a volume, a tree or a window pattern you did not draw, remove it or say so. "Why this cladding?" deserves a real answer, even if the answer is "the render chose it, and I'm testing whether I agree."
- Use the line check as an exhibit. The overlay shows, in blue and red, what came from your drawing. It turns "is this cheating?" into a conversation about design.
- Keep drawings in your portfolio. Employers want to see how you think and that you can draw. Labelled renders support that; they do not replace it.
A caption that works:
AI render (Inkfinish) from my hand sketch. Prompt: cedar cladding and pale concrete, night, snow. Line check: 82% of sketch lines kept.
When $15 is worth it
Standard is $15 a month: 800 credits, which is 160 renders, with no watermark, about $0.09 per render. Prices are in USD before tax, you can cancel any time, and unused paid credits reset each month.
It is worth it when clean images matter and you are iterating a lot: final review, a portfolio push, a competition entry. One month, then cancel, is a reasonable plan. It is probably not worth it for a single crit with one or two sketches, where the free renders and a clear caption may be enough. Pro, at $45 a month for 600 renders, is meant for studios rendering every day. Both plans are on the pricing page.
Limits
- It makes images, not drawings. No plans, sections, 3D models, animation or very large upscales.
- It can add or change things. As the house shows, a tree can change species and a volume can appear. Check every render.
- Faint sketches give it little to hold on to, for the render and for the line check.
- Plants are approximate. Species are not reliable.
- Sign-in is Google only.
- Free renders carry a watermark.
The sketch-to-render guide covers the method across every subject, and does AI rendering keep your design? goes deeper into reading the overlay. Sign in with a Google account and your first 3 renders are free, so you can test them on tonight's sketch: start free.